Say you have an application that uses P/Invoke (the DllImport attribute on an external method defined in a native DLL) to access some particular functionality. A lot of the use for this feature is to get to something in the Windows API that isn't exposed by the .NET Framework. But there are also folks using P/Invoke to call their own code from their own DLLs. The question then arises: where should you keep that DLL you're using (oh, please, not System32, anywhere but System32 -- years ago a buddy said "the registry is a giant and complicated database that tells you all your COM objects and DLLs are in System32") and how is it going to get deployed from your computer to wherever you install it?
If you try to add a random file to your manifest on the Publish tab of a Visual Studio 2005 Winforms project, you will discover there really isn't a way to do it. The file has to be in the project. You can add things to your manifest with MaGeUI (Manifest Generator with a User Interface, so named because MaGe is entirely command-line) which you can run from a Visual Studio command prompt, but most of us want to manage our manifests with Visual Studio. Heck, you could edit your manifest with Notepad -- it's only XML -- but that's not what I'd call the popular choice.
You could add the DLL to your project, but if it's under development, you're going to have to hand-update your copy when it changes, or your tests won't be accurate. And for a lot of folks, adding it to the project is going to mean adding it to source control, and binaries in source control does not sit well with me. Here's a better way.
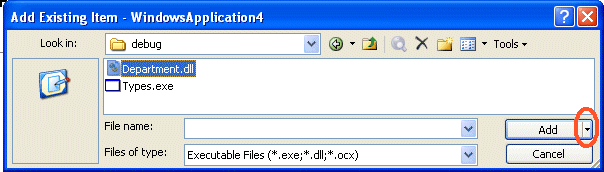
Start as though you were going to add the DLL to the project. Right-click the project in solution explorer, Add, Add Existing Item, browse to where the DLL is, change the file type to All Files or Executables, click the file name - but don't click the Add button. It's a compound button, so click the little Arrow next to Add and choose Add As Link.
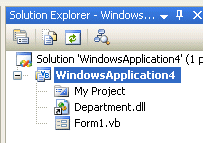
You should see your file added to Solution Explorer with a sort of shortcut symbol:
Click once on the DLL then bring up the properties for the file. Make sure Build Action is set to Content and Copy To Output Directory is set to Copy If Newer. (If the DLL is on the network, and you're working offline, on a plane or something, and you've built once so you have a copy already, you can flip this setting back to Do Not Copy so your builds don't fail.)
A word about "where the DLL is". If you develop alone, this can be some sort of c:\working\clientname\projectname idea, but for a team, that's not going to work. This path is going into your project file and you'll check it in to source control and the rest of the team will be using it. Unless you all have the same folder structure, you're going to want to use a UNC name. It's probably best to point it at a share where you publish the DLL after you build it.
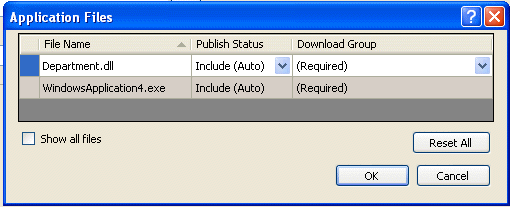
Having added the file to the project, you can now make it part of what you publish. Click Application Files on the Publish tab and you should see it there. You might need to check the Show All Files box, but I didn't:
This isn't available in every kind of project -- I can't do it in a C++ WinForms app, for example -- and it doesn't really work for an ASP.NET app where there is no project file, just the folder. I think for those a pre- or post build step to copy the DLL from where you build it or from the share where it is published for all developers to use would be the way to go.
Kate